Tablature, or Tab, is a very important tool that allows guitar players to easily learn how to play chords, melodies, and songs. Learning how to read guitar Tab can be a mystery for some newer guitar players. In this guitar lesson, we are going to learn how to read guitar Tabs and go over some of the more common elements you will see when you pull up a Tab for a song you want to learn. Try this lesson if you want to learn how to read guitar sheet music.
Throughout this guide you will get some tips to help you avoid a lot of the trouble areas that most new players experience when learning how to read Tabs. This will help you to learn your favorite songs a lot faster and a lot easier.
The 3 Basic Numbering Systems
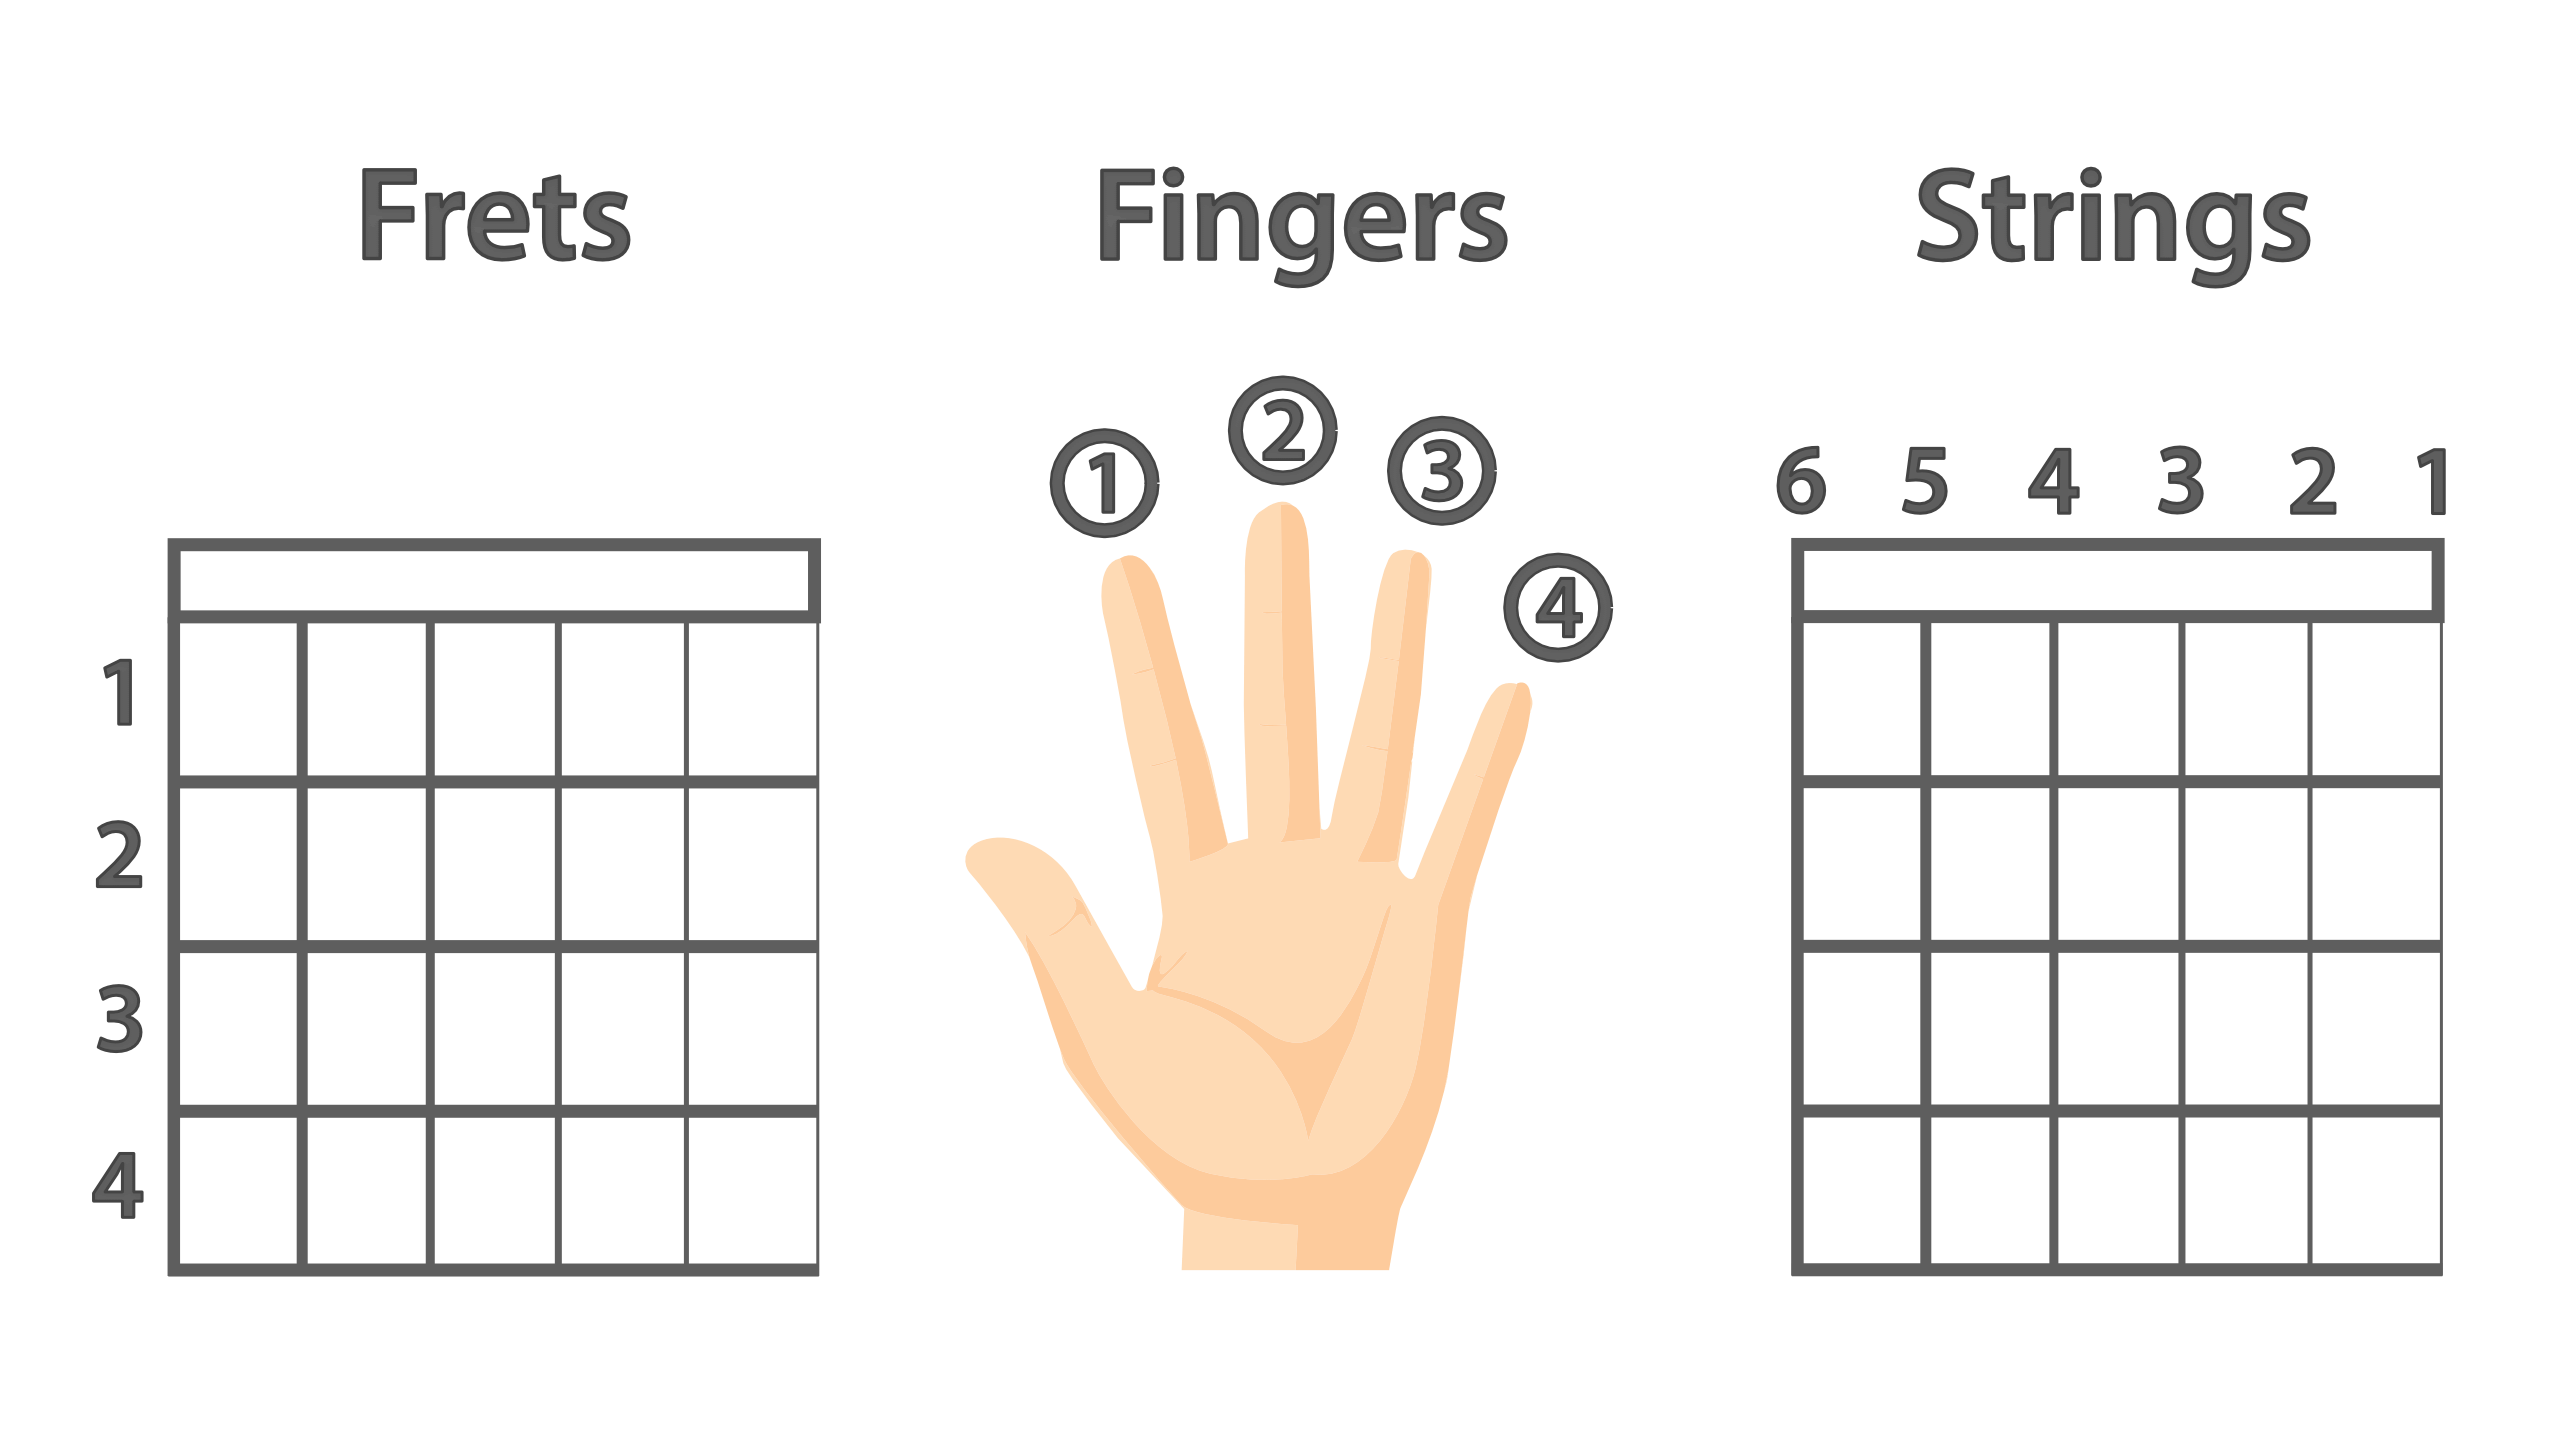
Before we get into reading Tabs let’s make sure you know the 3 Basic Numbering Systems that all guitar players need to have down.
Frets: Frets are the metal strips that go along the neck of the guitar. The one farthest to your left, if you are right handed, is the first fret. The next one to the right of the first one is the second and so on. This is very simple but it’s important to understand for when you start learning chords and scales.
Fingers: The numbering system for the fingers on your fretting hand is very simple but also important. Your index finger is your first finger, your middle finger is your second finger, your ring finger is your third finger, and your pinky is your fourth finger. Again, super-simple but really important for when you start learning where to put your fingers to make chords.
Strings: The final numbering system is for the open strings of the guitar. The thinnest string is the first string and the thickest string is the sixth string. Pretty easy to remember.
For more on the 3 numbering systems for guitar check out Fingers, Frets, & Strings.
The Basic Layout
Let’s learn the basic layout of Tabs. When you take a look at a Tab that you want to learn you will most likely see some standard notation on top and the Tab on the bottom. The six strings of the guitar are represented by the six horizontal lines of the Tab. The top line represents the high E string of the guitar and the bottom line represents the low E string of the guitar. This can seem a bit counterintuitive to some people so just remember that the top line is the thinnest string and you will be good to go.

Tab Tip: Keep in mind, you'll always read Tab from left to right. The only time you'll play multiple notes at the same time are when they are stacked on top of one another.
Notes & Chords
The numbers you will see on a piece of tablature represent the frets you are supposed to put your fingers on. You read these numbers from left to right just like you would read a book.
Notes: Single numbers from left to right represent a melody line or solo that you might play.
Chords: Stacked numbers represent a chord of some kind.

Palm Muting & Muted Notes
Now that we’ve gone over the basic layout of Tab let’s take a look at some of the more common elements that you will see when figuring out some of your favorite songs.
Palm Muting: The first element I want to go over with you is palm muting. Palm muting is represented by a “P.M.—“ marker. The little dashes represent how long you should continue to palm mute the notes.
Muted Notes: Dead notes, or muted notes, are represented by an “x” on a particular string. When you see a dead note you should mute the note with either your left or right hand and play that note so the pitch is completely muted. This happens a lot in strumming patterns and raked parts of lead lines.

To learn how to incorporate muted notes into your playing check out these Dynamic Strumming Tips.
Bending: Bending is a pretty common element of Tab. You can tell that you are supposed to bend a note by an upward pointing arrow next to one or more numbers. The distance you are to bend the note will be defined by an indicator next to the arrow. It might be a “full” bend or a “1/2” bend. Once you are exposed to a couple of bends you will quickly catch on to the basic idea.

Bending Tip: A full bend involves bending up a whole step. A half bend involves bending up a half step.
Want to learn how to bend the strings? How To Bend Guitar Strings.
Sliding
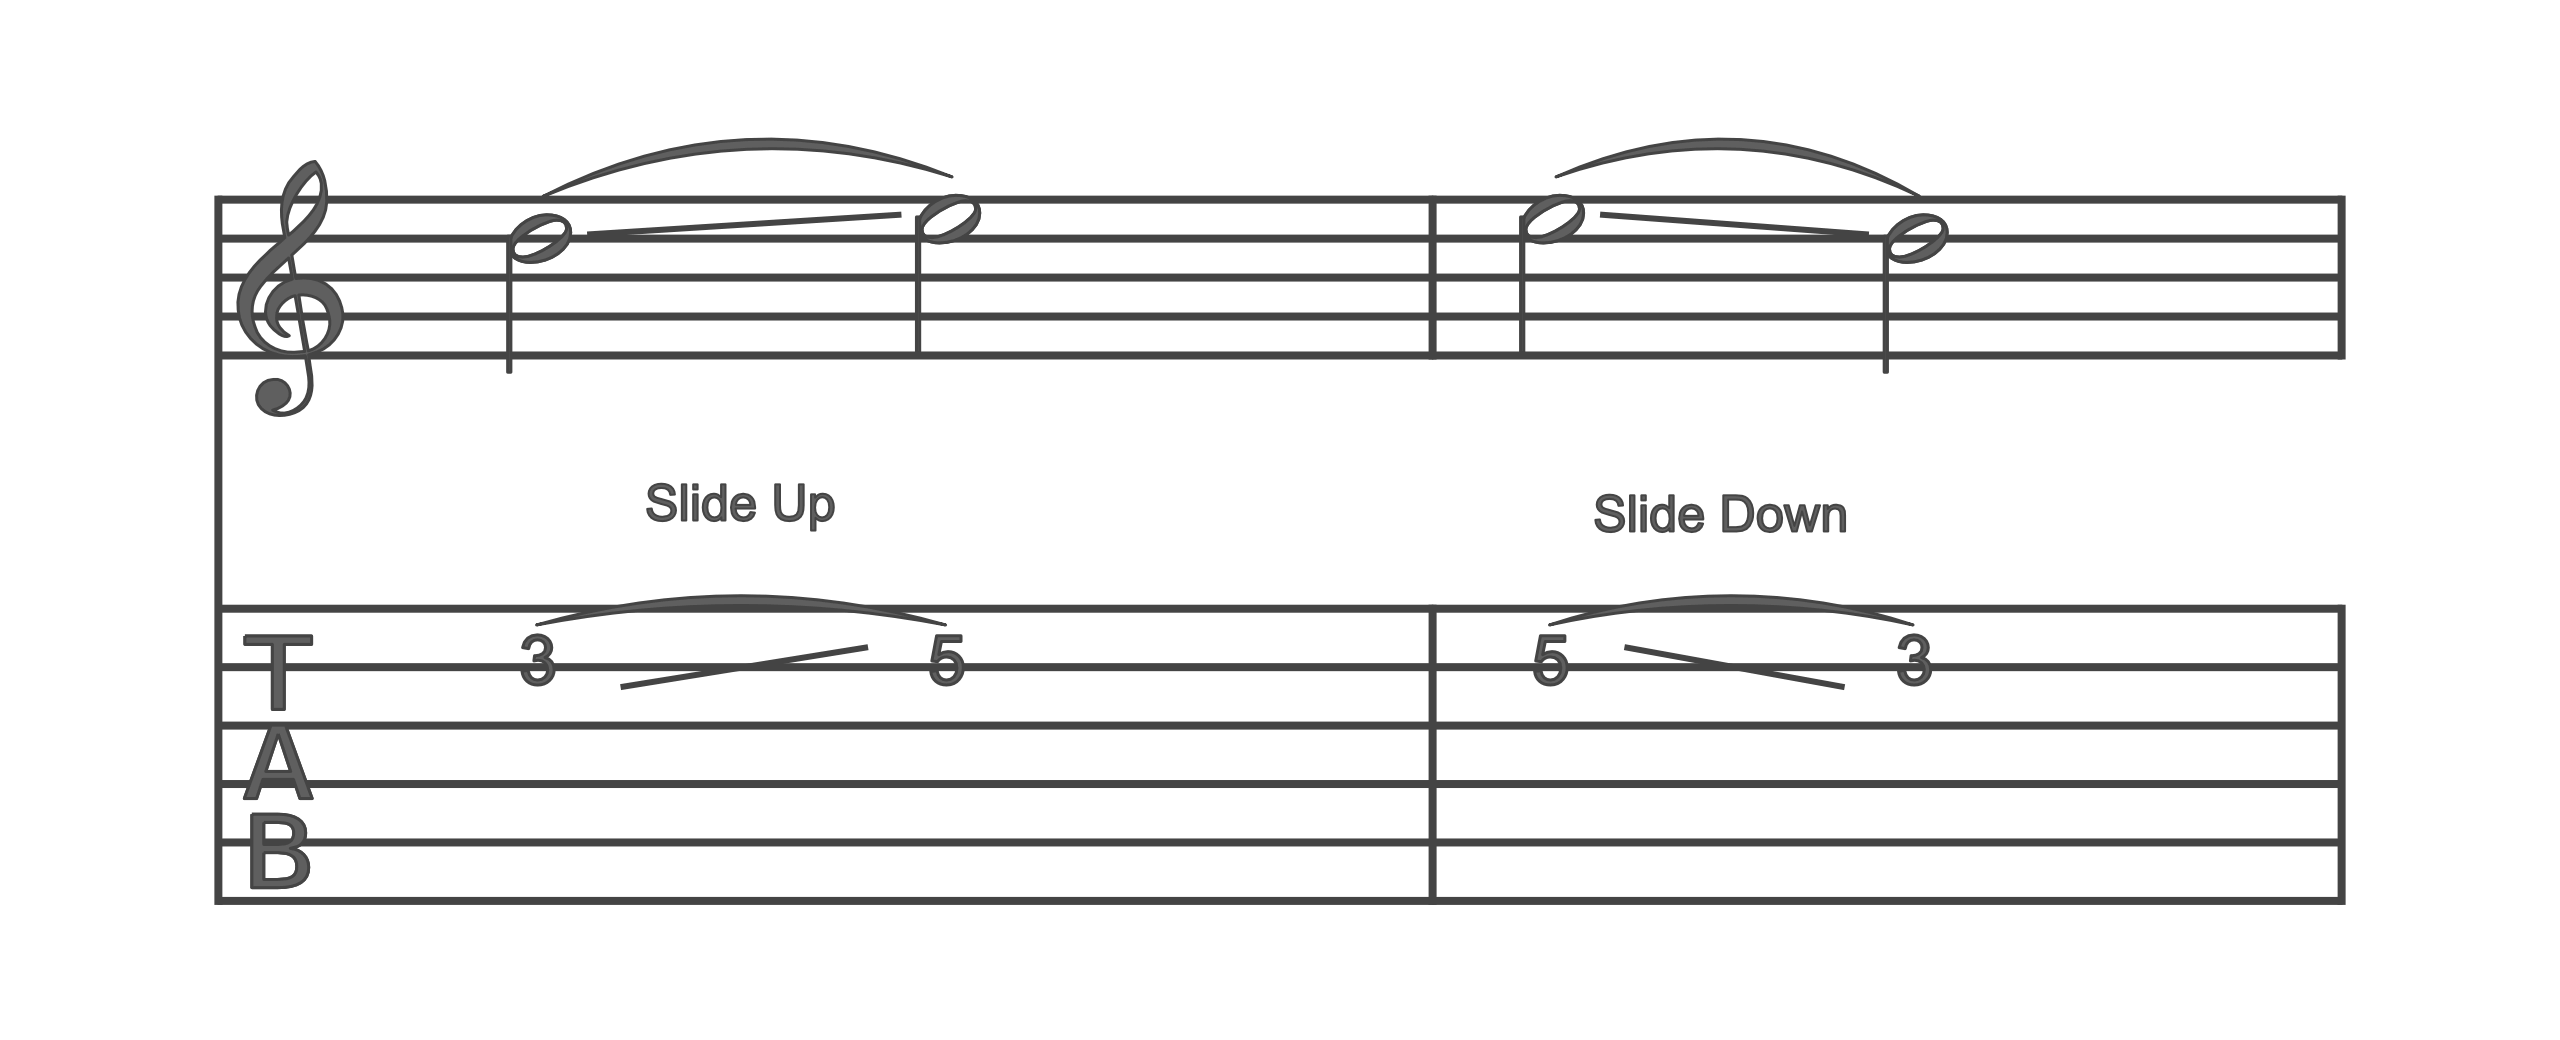
Sliding on the guitar is represented by a fret number, a line, and then another fret number. The line will be slanted up or down depending on if you are sliding from a higher pitch to a lower pitch or vice versa.
Hammer-ons & Pull-offs
You can identify hammer-ons and pull-offs by a little slur or arc between two or more adjacent notes. It can take a while to get to where you can quickly interpret this, but once you are exposed to a few musical situations like this you will get the idea.

Legato Tip: Hammer-ons and pull-offs are frequently referred to as "Legato".
If you want to learn how to use hammer-ons and pull-offs check out this lesson on Hammer-Ons & Pull-Offs.
Vibrato
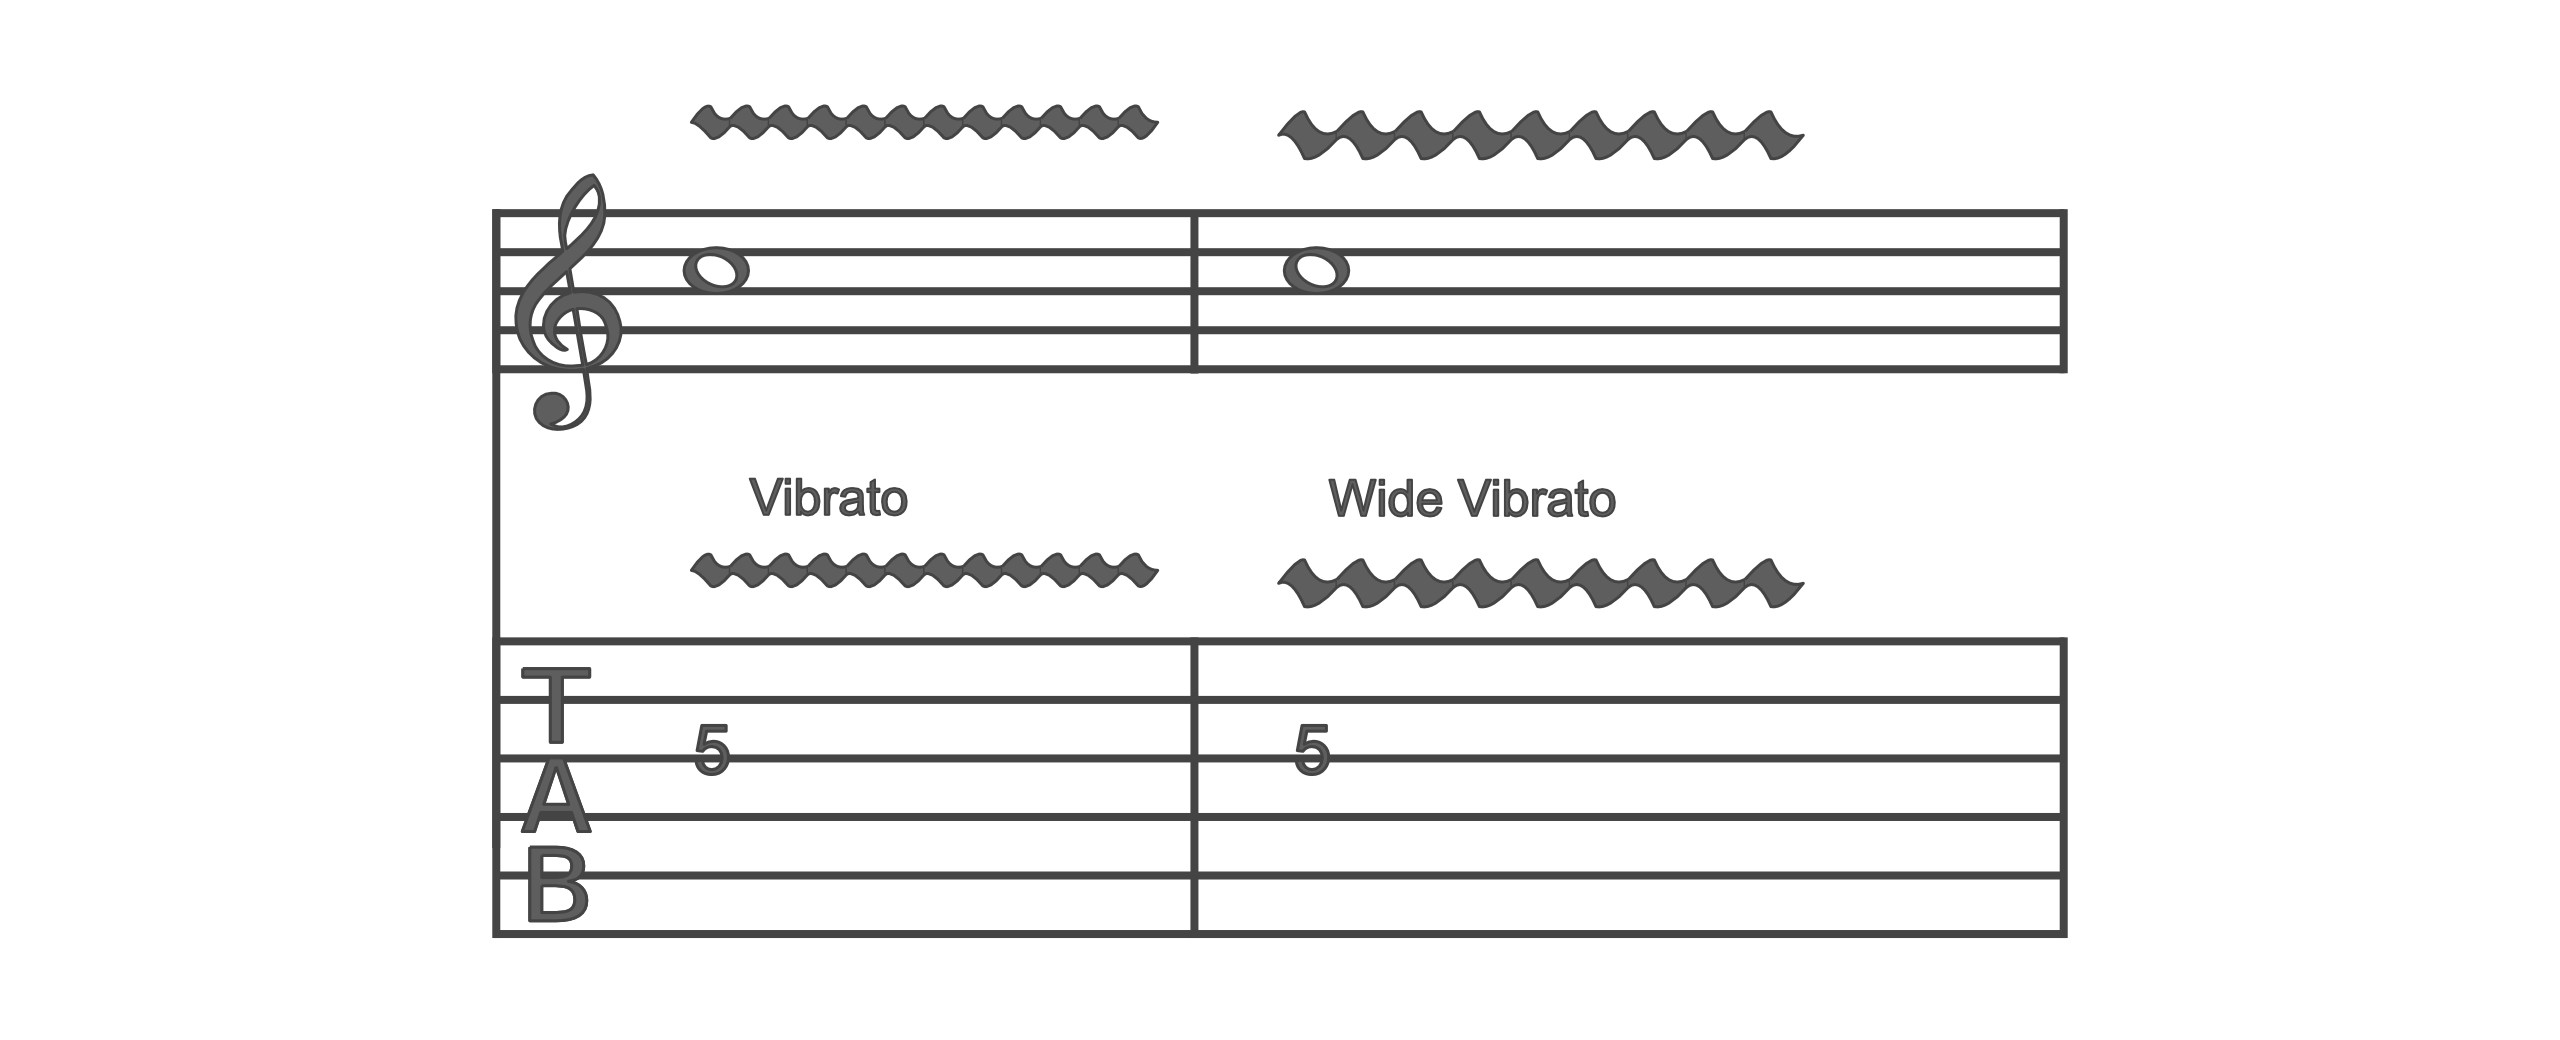
Vibrato is when you repeatedly bend and release a note over and over for an expressive vocal effect. This is usually represented by a squiggly line over a note. You can tell how intense or wide the vibrato should be by the thickness or boldness of the squiggly line.
Need help with your vibrato? Learn How To Use Vibrato.
Downstrokes & Upstrokes
Downstroke indicators look like a squared off upside down “U”, and upstrokes indicators look like a downward facing arrow. If the composer wrote a piece of music with a specific picking pattern in mind you will see picking indicators. If they didn’t you will not see any indicators and be free to experiment with your own picking patterns.
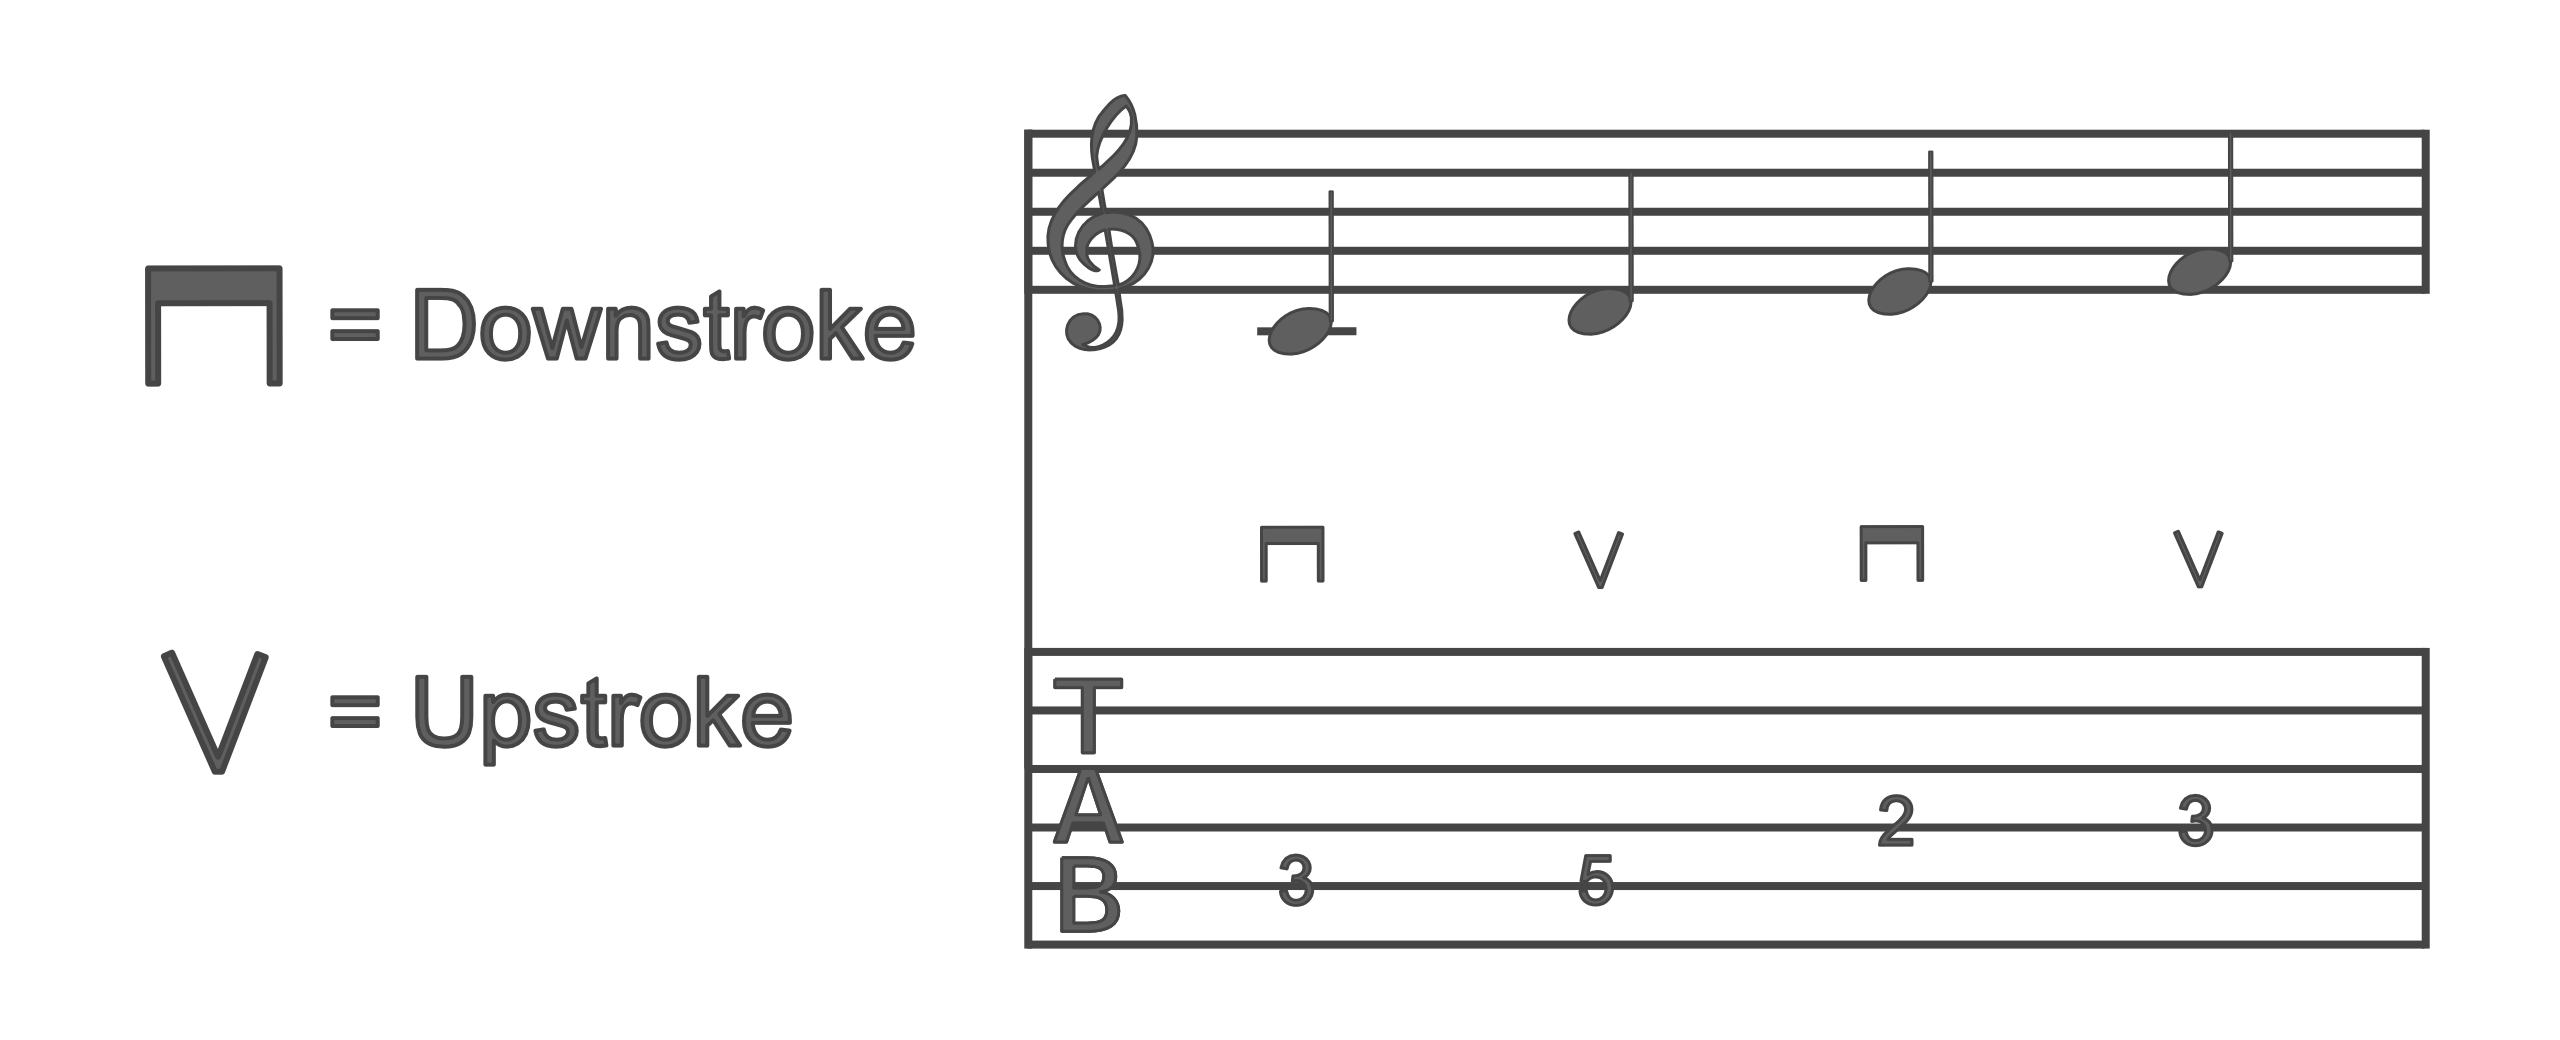
Check out this lesson on Basic Picking Technique for more info on using downstrokes and upstrokes.
