Welcome to video eight in the Beginner Guitar Quick-Start Series. In this lesson, we’re going to go through your first two chords. You’ll learn A minor 7 and C major. These two guitar chords will be useful for you because you’ll be using them often through your guitar career. A minor 7 is good to start with because it is fairly easy, and C major is great chord to learn how to play clean sounding chords.
Throughout this lesson, I’ll give you tips for your fretting hand to help keep your chords sounding clean and free from buzzing noise. I’ll also give you some extra tips that are more subjective, but can still apply to almost everyone.
How To Read A Chord Diagram
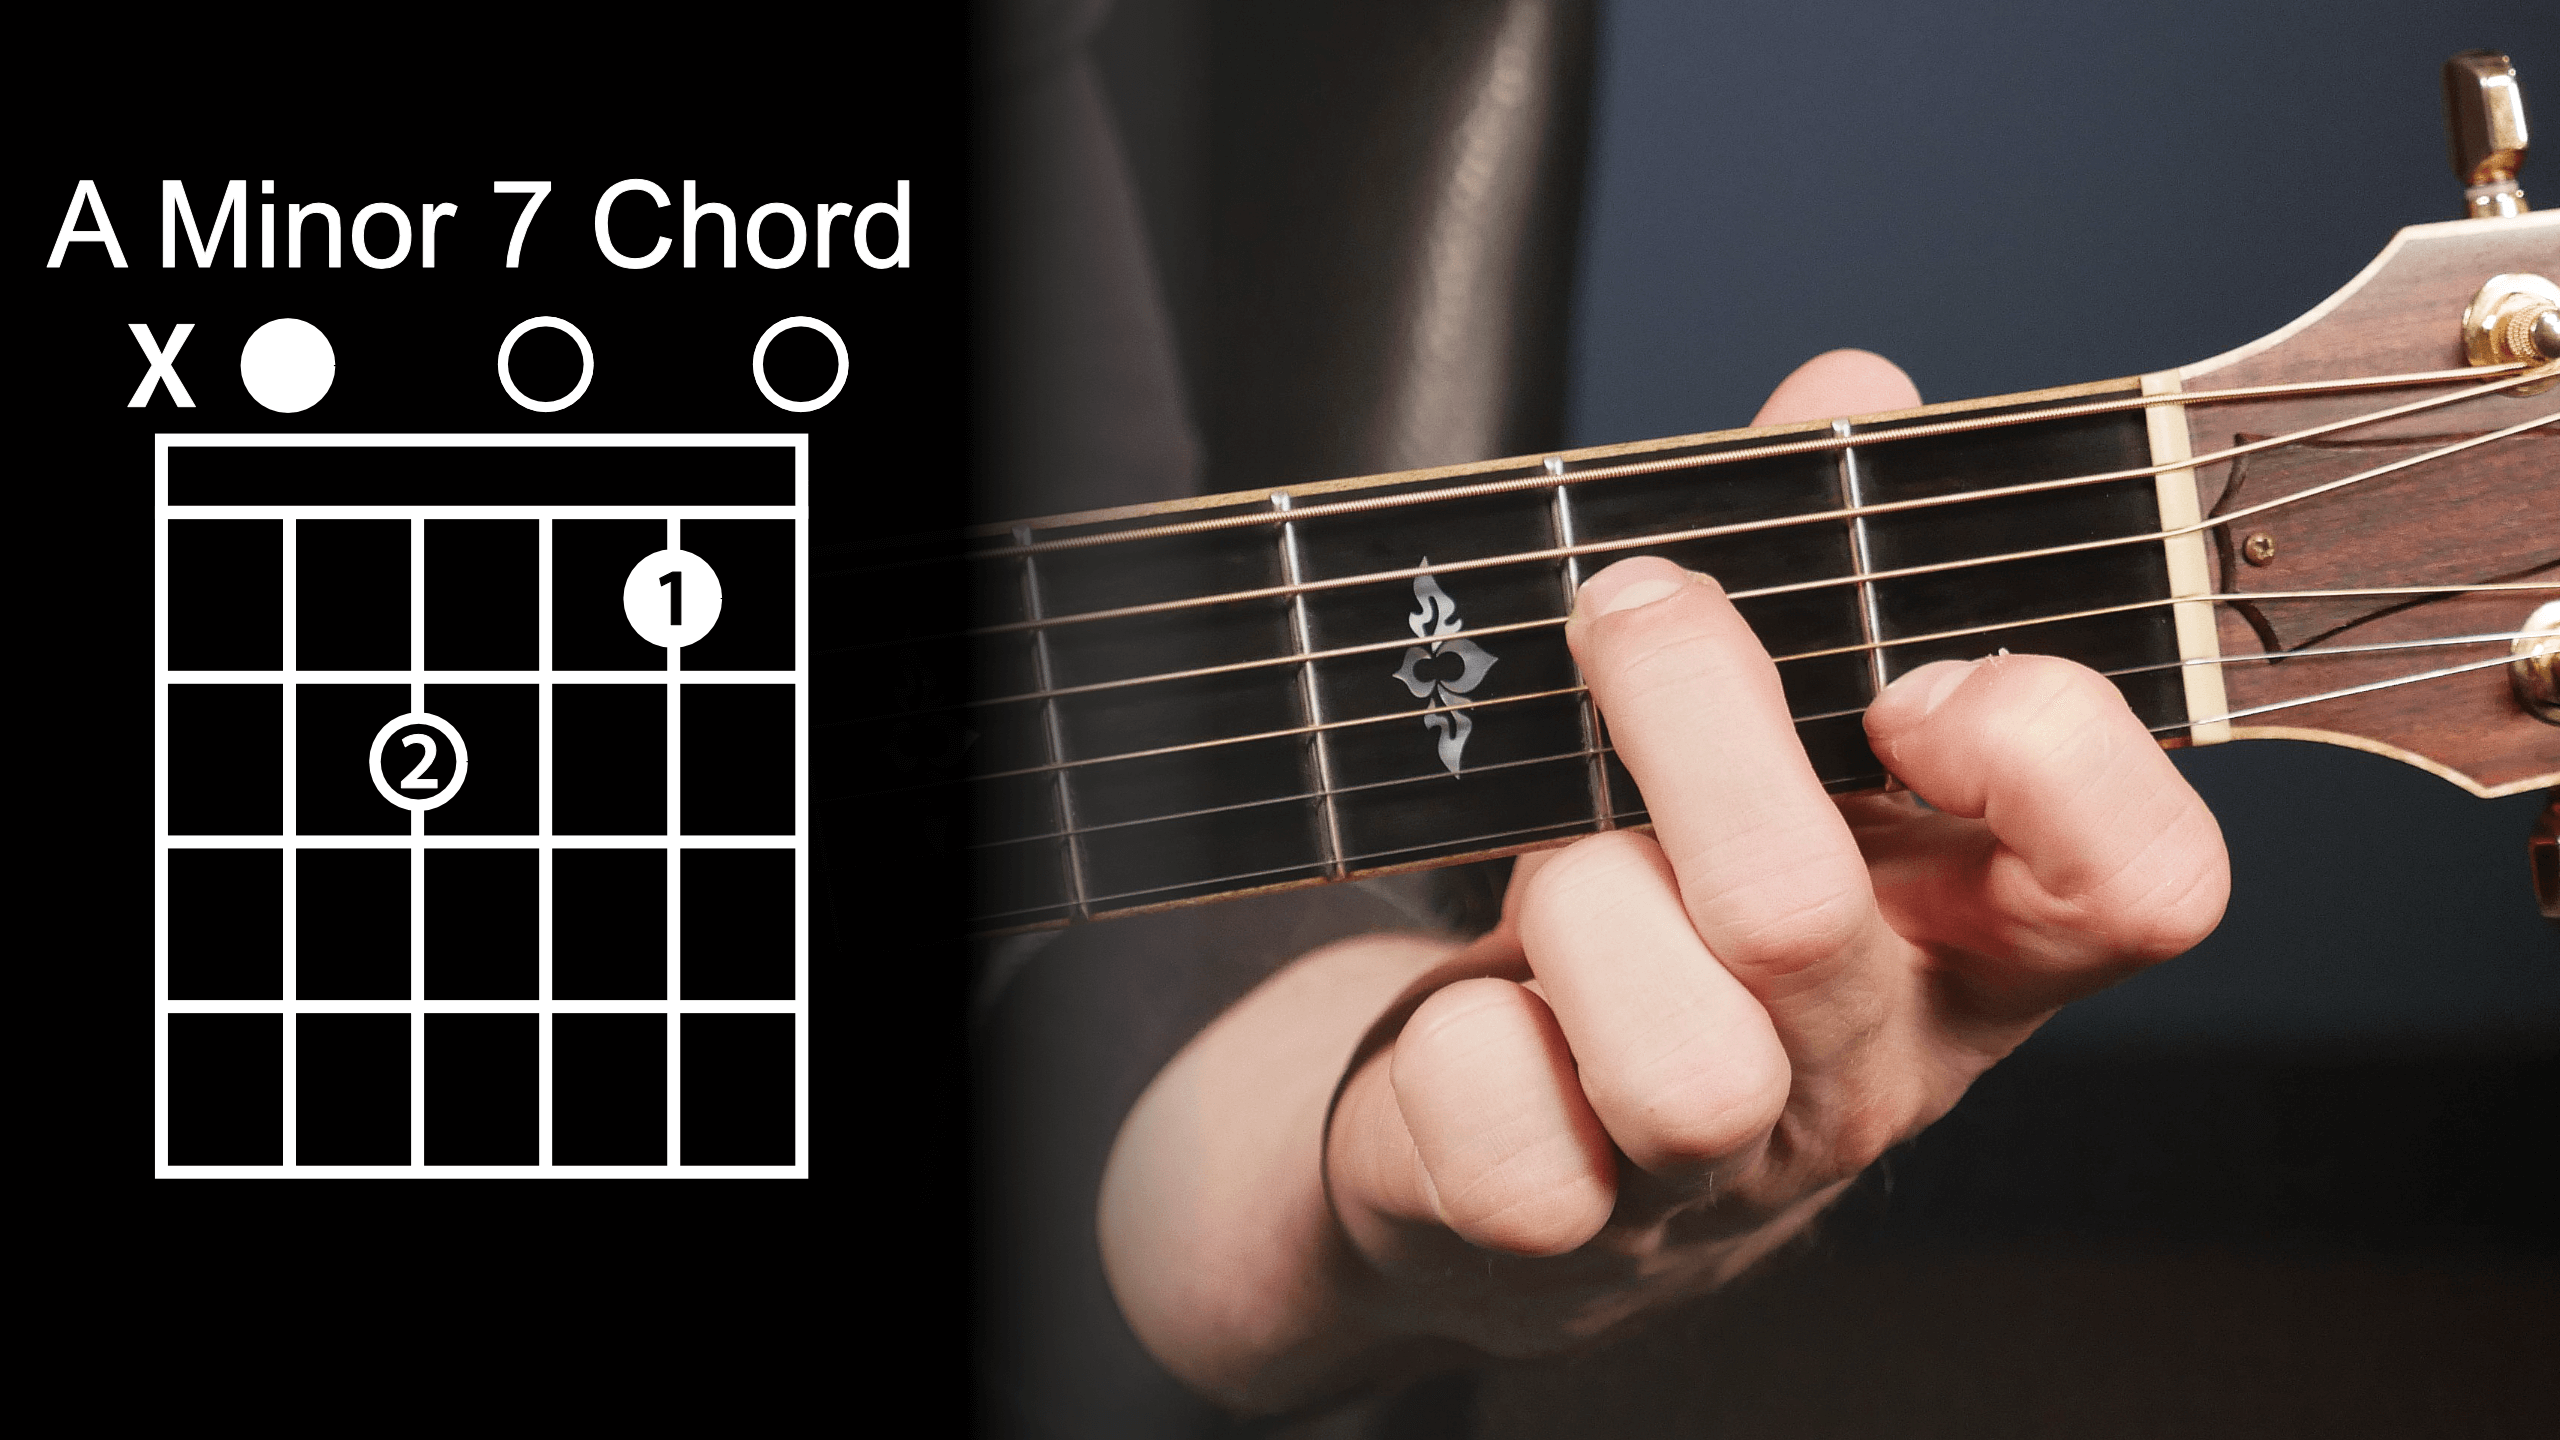
Before we start playing any chords, you need to know how to read a chord diagram. If you look at a chord diagram, you’ll see six vertical lines that represent the strings on the guitar. The line on the very left represents the low E string, and the line on the far right represents the high E string.
The horizontal lines on the chord diagram represent the frets, and the chord diagrams in this lesson have a rectangle at the top of the diagram. That rectangle, or box, represents the nut of the guitar so you can keep track of where you are.
The dots on the chord diagram tell you where to put your fingers. If a dot is colored in, it represents the root note of the chord you’re playing. If the dot has a number inside of it, it’s telling you which finger to use when you make that chord shape.
For example, with the A minor 7 chord, you can see on the chord diagram a circle with a ‘1’ in it on the first fret of the B string. This means you need to use your first finger to play the first fret on the B string.
Another part of chord diagrams to understand is if ‘X’ appears above the nut at all. If you see an ‘X’ above a string, that means that you won’t play that string at all. For A minor 7, you’ll leave the E string out when you strum.
Chord Tip: Make sure you are relaxed. Shake out any excess tension so you can avoid injuries. Stay relaxed as you play these chords. The only pain you may feel is in your fingertips as your calluses build up. After about a month of playing regularly, that pain will go away.
Chord Technique Tips
To get started, put your fretting hand out in front of you and pretend you’re holding an apple or baseball. For fretting hand technique, this is the posture you want to have. Place your thumb on the back of the neck of the guitar, which is the perfect starting position for learning chords.
A lot of guitar players kink their wrists either too far forward or too far back behind the guitar. If your wrist is too far forward, it can really hurt your hand. If your wrist is too far back, you won’t be able to reach around to make your chords. Keep your wrist fairly straight instead, like I do in the video.
The A Minor 7 Chord
First off, there are two more techniques I want to talk about. These are fret placement and finger posture. Place your first finger on the first fret of the B string. For fret placement, you’ll want to have your finger right behind the fret. In the video, you can see that the further away from the fret I place my finger, the more buzz the note has.

For finger posture, you want to come down right on the very tip of your finger. If I don’t come down on the tip of my finger, my finger will brush against the high E string and accidentally mute it. Staying on the tips of your fingers ensures that you’re not muting any of the surrounding strings.
For the second note of the A minor 7 chord, place your second finger on the second fret of the D string. This is the second of the two notes you need to fret to play this chord. Make sure you’re on the tip of your finger and right behind the fret. Now that you have both notes in place, strum the top five strings, remembering to leave the low E string out.
Listen to the A minor 7 chord as you strum it, checking if it was clean and clear or muted and buzzy. It may take you some time to build up the coordination and muscle you need, but if you remember to stay on the tips of your fingers and come right behind the frets, your chords will sound clean.
Chord Tip
When you’re learning a new chord, make the shape and leave it on the guitar for about thirty seconds. Then remove your hand, shake it out, and make the chord shape again. It may take some time for you to make the chord shape again, but that’s okay because you’re working on your muscle memory. Repeating this process a few times is a great way of memorizing your chords.
The C Major Chord
Now we’re going to learn the C major chord, which is a great chord to see if you are coming down on the tips of your fingers or not. Tweaking your fretting hand posture just a little makes a big difference in the sound of the chord.

To make the C major chord, first make the A minor 7 shape, and then stretch your third finger to the third fret of the A string. You’ll notice on the chord diagram that this note is colored in, which means it is a root note for the C major chord, making it a C note.
With the C major chord, put that shape on the guitar for thirty seconds, take it off, shake it out, and repeat the process a few times. As you’re making the shape, remember to come right behind the frets on the tips of your fingers. When you’re starting out, you may have to place each finger down one at a time, but that’s natural. You’ll get better with time and eventually be able to go right to the chord.
Memorizing Chords
When you’re learning new chords, if you can study them and memorize them in multiple ways, you’ll have a better chance of remembering it. One tip I have for you is to look at the chord and memorize what the chord shape actually looks like. You can also try looking away from the chord and concentrate on what the chord feels like.
Another tip to help you memorize chords faster is to practice them several times a day. If you can, practice your chords four or five times a day, for five minutes at a time. The more times in one day you can practice the chords, the faster you’ll learn them and the sooner your hands will remember them.
As you start practicing, your fingers may be sore for a while, but that will pass with four to six weeks. One thing I want to warn you about is that new guitar players can get frustrated when they can’t play clean chords because they try to switch between chords too soon. Often, they try to switch chords before they’ve really learned and memorized each chord shape. For now, don’t worry about switching chords and just work on each shape, getting them down, and going right to them.
In the next lesson, we’ll learn two more chords for you to add to your chord library. I’ll also give you some tips on how to switch chords smoothly since that can be something many beginners have trouble with. If you have any questions about making chords or how to make them sound good, you can feel free to contact us for help.
Next Lesson - Two More Guitar Chords
