Welcome to the third video of the Blues Guitar Quick-Start Series. In this lesson, we’re going to learn about dominant seventh chords, including a few shapes and how to apply them to the standard 12-bar blues progression.
Dominant seventh chords are a big contributing factor to the overall sound of blues music. While blues music doesn’t always use dominant seventh chords, it is still very common to see these chords throughout blues songs.
A dominant seventh chord is made by adding a lowered seventh scale degree to a major chord. Don’t worry too much about the details yet, but I just want you to understand the basics of what a dominant seventh chord is. The focus of this lesson is learning the chord shapes and getting your ears familiar with the sound of these chords.
Generally, major keys only have a dominant seventh chord appear for the 5 chord, but when you’re playing the blues, you can get away with playing dominant seventh chords for all the chords in the 12-bar blues progression – the 1 4 and 5. This is where the magic of blues music is, somewhere between a minor and major tonality.
Let’s start learning some of the dominant seventh chord shapes. We’ll continue in the key of E blues. If you know your 1 4 5 chords in the key of E, which are E, A, and B, then you can learn and use seventh chords for those chords.
Learning the E dominant seventh chord is easy if you already know your open E major chord shape. All you need to do is take your third finger off the D string. That means your first finger is on the first fret of the G string and your second finger is on the second fret of the A string, and you can strum all six strings.
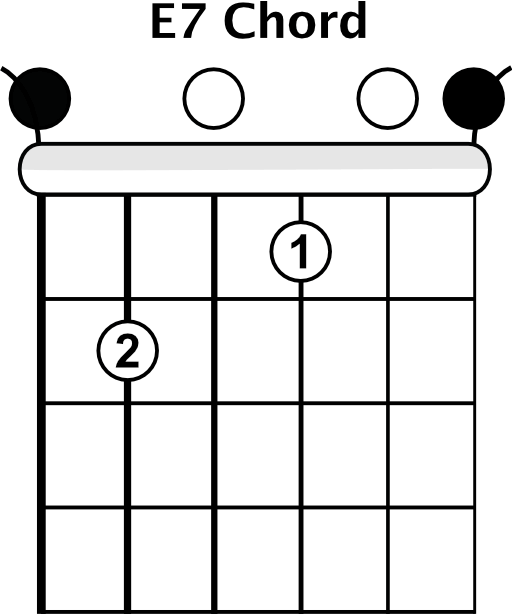
It’s good to start by practicing switching back and forth between the E major chord and the E dominant seventh chord. You also want to listen for the difference between the two chords and get familiar with those sounds. Remember when you’re making this chord to come down on the tips of your fingers and right behind the fret so you get a nice clean sound.
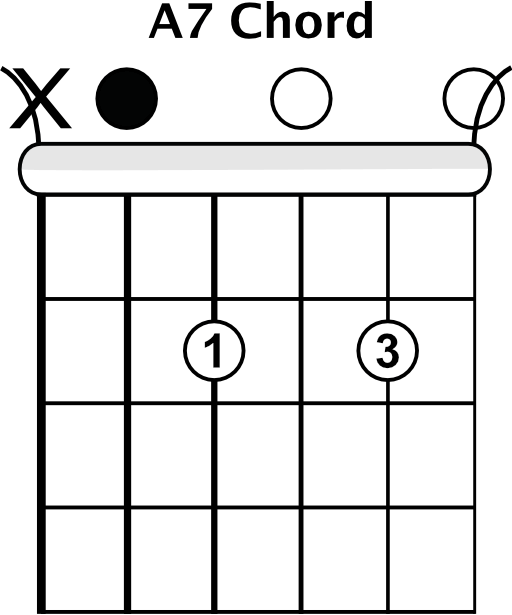
The next chord shape we’ll learn is an A dominant seventh chord. Make your open A shape and then take your second finger off the G string. Remember to leave out the low E when strumming, and really listen for the difference between these major and dominant 7th chords. You’ll want to memorize the sound and be able to recognize dominant seventh chords right away.
The last seventh chord shape we need to learn to play through our blues progression is a B dominant seventh chord, and this is actually a bar chord. Make your bar on the second fret, then make an A major shape with your second, third, and fourth fingers on the fourth fret. To finish, remove your third finger from the G string.
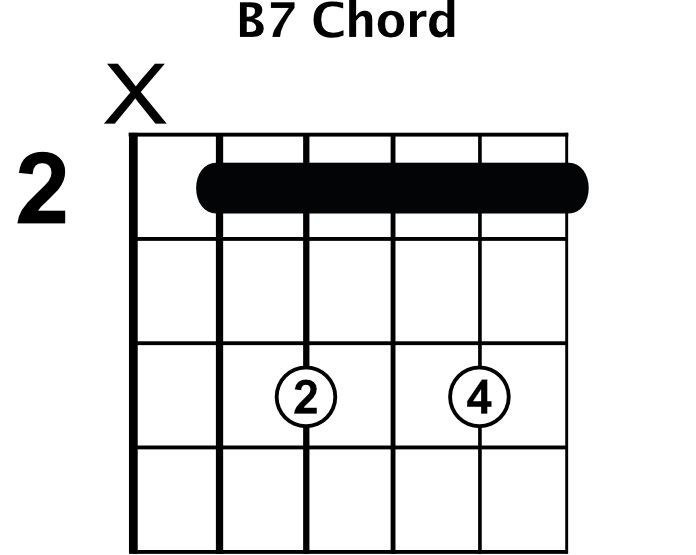
I do find that this fingering technique is a little odd, so I change it up. I’ll keep my index finger as the bar, but grab the fourth fret of the D string with my third finger and grab the fourth fret of the B string with my fourth finger.
Once you have these three dominant seventh chords down, you can begin applying them to the standard 12-bar blues progression. Make sure you have them down enough to go right to the shapes on their own before trying to switch between them all, otherwise you might frustrate yourself.
You can watch the video to see me play an example of what the standard 12-bar blues progression will sound like using the dominant seventh chords. After watching, you can hear how using these chords give the music a signature blues sound. Try to commit the sound of these chords to memory, so anytime you hear dominant seventh chords, you can instantly recognize them.
I’m going to teach you a few more dominant seventh chord shapes so you can learn them as you go. Think of this part of the lesson as a reference for when you’re learning how to play blues in other keys.
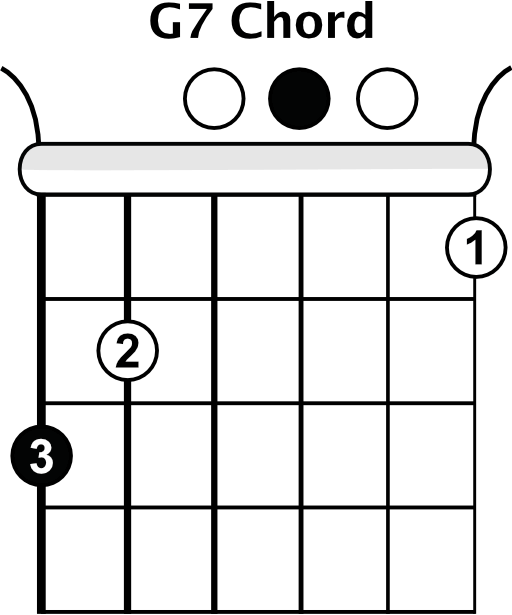
The first chord I’ll show you is a G dominant seventh chord, and you can reference your open G chord shape. From the open G chord, you’ll remove your fourth finger from the third fret of the high E string. Keep your second and third fingers where they are, place your first finger on the first fret of the high E string.
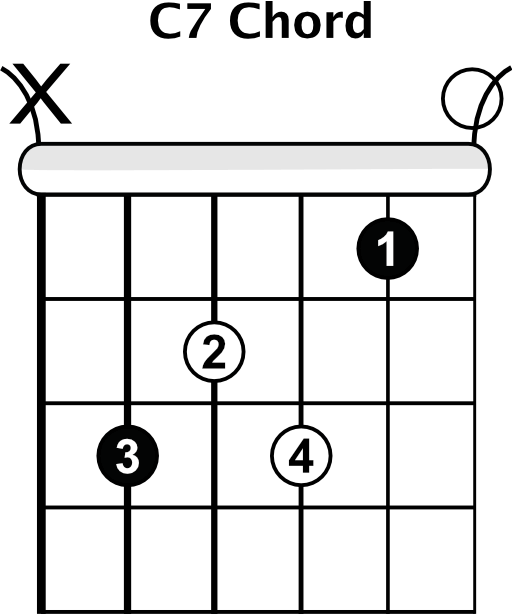
The next one we’ll go over is a C dominant seventh chord. Again, start with your open C chord shape and leave those three fingers in place. All you need to do is place your fourth finger on the third fret of the G string. Make sure to leave the low E string out when strumming.
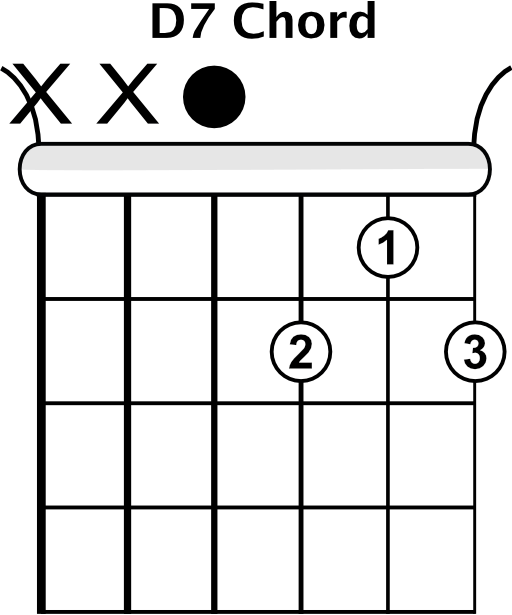
We’ll go over the D dominant seventh chord next. Reference the open D chord shape, but the fingering will change because we have to move the note on the B string down two frets to the first fret. Place your third finger on the second fret of the high E string, second finger on the second fret of the G string, and your first finger on the first fret of the B string.
The last dominant seventh chord shape we’ll look at is for your E bar chord shape. If I’m playing an A bar chord shape using the E bar chord shape, it’s really easy to make this into a dominant seventh chord shape. All you need to do is take your pinky off the D string. This works for this bar chord shape on any fret.
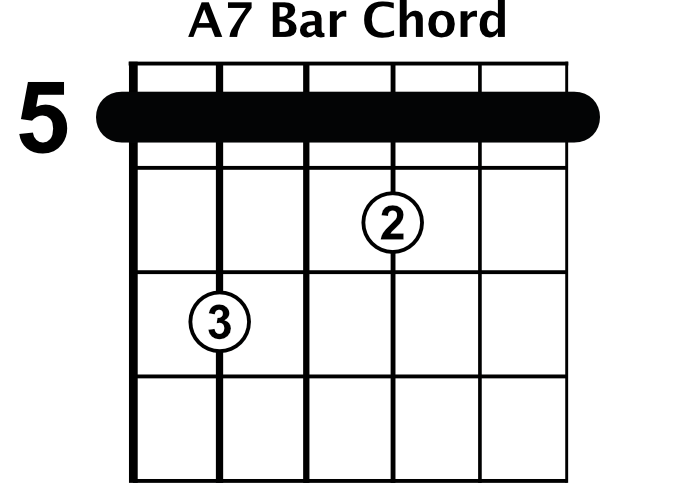
Take your time with these extra dominant seventh chord shapes. You may not use them right away, but you can always refer back to this lesson when you do need them.
Pull up the jam track for this lesson, either the 70 beats per minute or the 100 beats per minute, and try applying the dominant seventh chords to the standard 12-bar blues progression. If you need to, keep your rhythm and strumming really simple and concentrate on the chord changes.
In the next lesson, we’re going to approach blues rhythm guitar from a different angle. Instead of using power chords or dominant seventh chords, we’re going to learn a blues riff to play through the standard 12-bar blues progression.
Next Lesson - The Basic 12-Bar Blues Riff
