Welcome to the fifth video of the Rhythm Guitar Quick-Start Series. In this lesson we’re going to learn another important bar chord shape, one built from the open A major chord using just the top five strings of the guitar.
This concept will be very similar to when we took power chords from the sixth string root note to the fifth string root note, as we’ll be moving the bar chord root note from the sixth to the fifth string. Getting this shape down is important so that, just like your power chords, you don’t have to jump all around the fretboard.
Before learning the new chord shape, take a look at the graphic on-screen to see the names of the notes on the A string. Those are going to be the root notes for this bar chord shape.


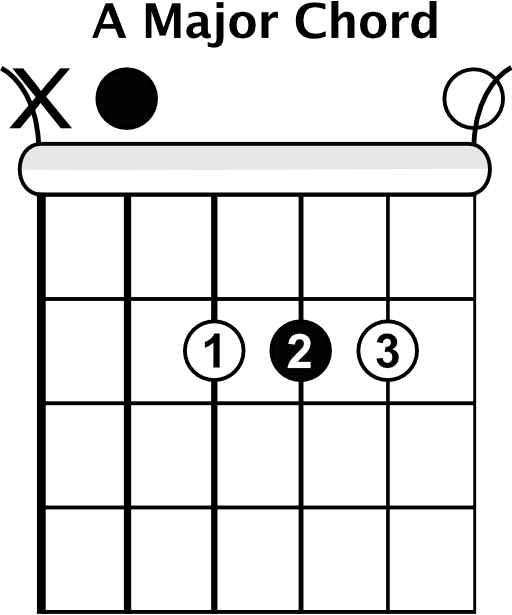
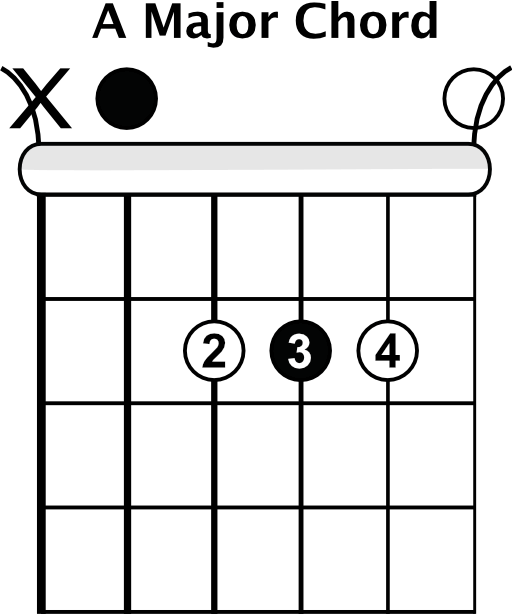
We’re going to start learning this shape by making an open A chord, because that’s the foundation of this bar chord. Just like the other bar chord you've learned, we need to make this shape with our second, third, and fourth fingers. All three fingers will be on the second fret, with your second finger on the D string, third finger on the G string, and fourth finger on the B string. Leave the low E string out, and strum just the top five strings. This will feel different from what you’re used to, so it may take a bit for it to seem natural.

Once you’ve got that shape down, you need to come down with your index finger to make a bar right on the nut of the guitar. Take time here to get used to the whole shape and how it feels.
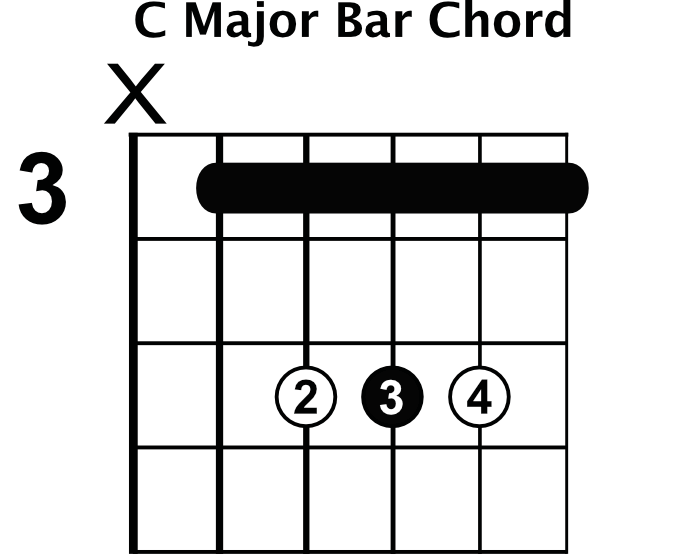
When you’re comfortable with the shape, move your bar up to the third fret and make your bar chord shape. Remember all the tips from video four about making a good sounding bar. Make your bar right behind the fret, come down with the bony edge of your finger, and adjust your bar vertically on the strings to get the cleanest sound.

When I’m making a five-string bar chord like this, I won’t always fret the sixth string, but my index finger will brush up against the string to mute it in case I accidentally hit it while strumming.
After your bar is in place on the third fret, come down on the strings with your second, third, ad fourth fingers to make the rest of your A shape. Now play the top five strings, leaving the sixth string out.
Once you’ve tried it, ask yourself if your bar chord sounded clean or if it sounded a little dead. If it was sounding dead or muted, double-check yourself. Make sure you’re coming down on the strings with the tips of your fingers and make sure your bar is strong behind the fret.
With this shape, you can train yourself in a couple of different ways again. Try putting your bar on first, followed by the rest of the shape, and then do the opposite by making your shape first and then the bar. Eventually, you’ll be comfortable enough to make this bar chord all at once.
After you’ve mastered this bar chord shape, you can try an alternate way of making it. You can use your third finger like a mini bar to hit all three strings in the A shape. It feels a little different and is a bit harder, but it’s another fingering method you can try out.
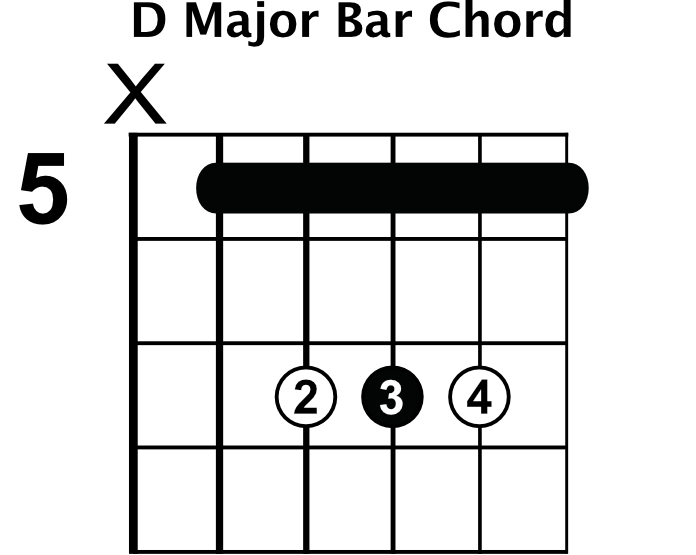
Play with this shape and practice by moving it all around the fretboard. Remember that the lowest note you play on the fifth string with your index finger is where you’ll get the specific name for each bar chord you’re playing. By getting familiar with the graphic on-screen you’ll know that a bar on the third fret makes a C bar chord, while being on the fifth fret would make a D bar chord.

Once you’re comfortable with this bar chord shape, you’ll need to start mixing it up with your sixth string shape, the E major bar chord. Just like the power chords we learned, this will keep you from having to jump all the way up and down the fretboard. As an example, playing a G-C-D progression on only the sixth strings means I’m moving around a lot. By using both sixth and fifth string bar chords, you see in the video that I have an easier time playing that chord progression.
You’ll need to get comfortable moving from the E shaped bar chord to the A shaped bar chord. That back and forth switch is a really important change every rhythm guitarist should have down. Using sixth and fifth bar string bar chords keeps you from jumping around the fretboard too much and helps you play a lot more efficiently.
Be sure to take enough time getting comfortable with each shape though before trying to switch between them. If you rush switching between bar chords before you’re ready, you’ll cause yourself a lot of frustration. Once you really have the shapes down, it will be easier to switch between them.
Now you need to apply this to some real music, so you can pull up the jam track for this lesson again. It is a G-C-D progression, and it’s one measure for each chord. You can keep it simple by playing a whole notes and concentrating on making your chords and changes well, or you can play quarter notes for every chord. You can check out my example of playing with the jam track in the video.
In that example, you can see again how using both the sixth and fifth string bar chord shapes keeps you from having to move all over the place. Instead, you can stay in one small area to play that chord progression.
Thanks for watching this video. In the next lesson, we’re going to go over some minor bar chords that you will need to add to your chord library. See you in video six: minor bar chord shapes.
Next Lesson - Minor Bar Chord Shapes
